|
|||||||||||||||||||||||||||||||||||||||
|
|
|||||||||||||||||||||||||||||||||||||||
|
WHY DOES IT COST SO MUCH?
That is the question every motorcycle owner utters when presented with the bill to get his or her machine ready for the road come spring time. That of course is only if that person did not properly prepare the bike for the long Canadian winter. Now I realize that talking about storing your bike for winter in July doesn't make much sense, but I have on numerous occasions tried to educate the masses on the importance of proper winter storage. However it would seem that my words of advice have been falling on deaf ears. Well folks, so much for an ounce of prevention, here's the pound of cure. It tastes awful but it works. The Patient
A guy I know at work was telling me how two years ago he never winterized his ride and ended up paying a dealership in the GTA over $600.00 to get it up and running again. The sad thing is he did the same thing again last Fall with nearly the same result this Spring. The only difference is I told him I'd have a look at it for less coin, as long as I could use him in Sonic's Workshop as an example to others of what not to do. Deal struck!! So I picked up his '92 Suzuki GS 500 from his house and trailered it to Sonic's Workshop. Keep in mind that if the motorcycle has not been stored properly then there is a very good chance that it will not start come Spring time. If the bike won't go then you'll need a tow, and if you need a tow then you'll need doe (hey, I'm a poet and didn't know it). The only thing this fellow did prior to storage was to drain the oil out. He never put any new stuff back in, just drained the old stuff out. (Bad). The gas was also left in the carbs and the tank was only half filled. (Also bad). To top it all, the battery was left in the machine and not attended to for the entire winter. (I feel a severe beating is in order here). High Voltage ... Not!
We have to start somewhere, so let's go with the battery shall we? The battery on this model is under the seat and is relatively easy to get at. With the battery out and on the bench, a voltage test, followed by a specific gravity test, was in order. Both failed miserably! To look on the bright side I think it will probably survive with a good long time on the trickle charger (as opposed to the fast blast on the 10 amp motorcycle battery killer they call the quick charge). The next step is to drain out that stuff that used to be gas from the carburetors. Gas that’s left in carburetors for long periods of time will evaporate, leaving a varnish like substance on the jets and needles and a gooey slime on the bottom of the float bowels. Of course, this does nothing to aid the bike in the start up process. As predicted the fluid that drained from the left carb was a brown sediment filled liquid that didn't much resemble gasoline. The right carb wouldn't even drain! The only remedy for this little trauma is to pull the carburetors from the bike, strip them down and clean them, thoroughly. (Add a couple of hours to the bill for that one!).
While removing the gummed up carbs, I discovered that the choke cable was rather sticky. I could pull the cable and activate the choke but the return spring was not strong enough to return the choke back to it's resting position. In most cases, but not all, copious amounts of cable lubricant will rectify a sticking cable. This one was one of the 'not all' cases. No matter how much lube was forced down that cables throat it just would not free up. New cable time (read more $$$)! The rest of the cables, including the tach and speedo cables, were lubricated with high temperature grease. The clutch and throttle cables had their free play adjusted, as well as being lubed with an aerosol cable lube and cable luber thingy. As with many jobs on a motorcycle, getting to the job itself is usually more work than fixing the actual problem. Removing carburetors is a good example of this and is usually a pain in the ass. You simply wouldn't believe how much shit can be in the way, or how little space the manufactures have allotted to perform this task. Hats off to Suzuki in this case, who allowed plenty of room to completely remove the air box. With the air box out of the way there is then more than enough room the pull the carbs back, up and out. Once out, both carburetors must be stripped and the various metal parts soaked in a caustic cleaner. After bath time is completed all the jets are then blown out with compressed air and reassembled. Valve Clearances ...
With the carbs removed from the bike it is an ideal time to check those valve clearances. Valve clearances have nothing to do with a failed winterization, but they should be checked and adjusted, if need be, once a year. With the carburetors out of the way, this job is suddenly so much easier. The GS 500 utilizes a shim over bucket adjusting system. That is a quarter size piece of hardened steel, available in varying thicknesses. These are located in 'buckets' that hold the shim and so prevent it from flying out at redline (in theory anyway). The bucket itself is located between the cams and the top of the valves. The first step of this process is to check each clearance to find out if they are to spec, and if not, whether they need to be made bigger or smaller. Once that is done you remove any non-to-spec shim from its holder and see what size it is. The size of the shim will be stamped onto its face, unless it was previously installed with the stamp mark facing up, in which case the rubbing of the cam on the shim will have effectively erased any discernible markings! With the size of the existing shims determined (and the old clearance recorded) you can now calculate whether you need a bigger or smaller shim size and exactly what size you will need. (Sounds complicated, can be complicated and will cost more $$$).
It's very important to periodically check these clearances, as valve clearances that are too tight will result in bad cylinder sealing, very poor performance and potential valve burning (more $$$). Whereas clearances that are too large will result in a noisy top end, which can lead to premature wear, as well as reduced performance. This GS had only two clearances that were too tight, which were easily swapped for a couple of skinnier ones. With the clearances out of the way, the carbs and air box (along with a new air filter - more $$$) can then be reinstalled. Next step is some new oil and a fresh oil filter. Toss in a set of new spark plugs for good measure, and the engine is all ready for a summer of happy motoring. It's all a matter of balance ...
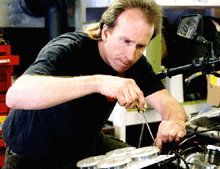
With the motor all happy we can now balance those newly cleaned carburetors. Balancing ensures both cylinders are getting exactly the same amount of fuel and air. If the carbs are not properly balanced or sync'd, one cylinder ends up doing all the work while the other one is just along for the ride - as proved to be the case with this GS. With carbs this far out of sync, (see picture both gauge readings should be close to each other) the engine will not perform well and also tend to sound like crap (especially at idle). Using vacuum gauges (hooked up to the inlet manifolds) makes this a very easy job. It's a matter of simply adjusting the balance screw (located between the carbs) until both gauges are reading the same. This is not a big job so long as you have the correct tools and ensure that the valve clearances have been checked first and are to spec. Valve clearances that are not set properly will result in inaccurate gauge readings. The heart is good. The chassis needs work ...
With the engine running nicely I can now start to work on the rest of the bike. We want it to be just as happy, more fun to ride and safer to boot. Over the winter (and through the summer for that matter), tire pressures will drop approximately 10% every month. The tires on the GS were at a unhealthy 5 P.S.I. on the front and 8 P.S.I. On the rear. This was corrected to 32 P.S.I. On both. The drive chain was the next port of call on this spring time tour of the world of two wheels. The chain, which needs constant attention throughout the year, was a dried out rusty thing that was suffering from a bad case of maladjustment. Fortunately ample chain lube and some fine adjustments made the world of difference. The worst case scenario would have been to replace the chain, in which case add another $100.00 plus to the final bill. Continuing on with the survey it was discovered that the brake fluid was in desperate need of replacement. Brake fluid is a clear fluid that slowly turns dark with age. The stuff in the master cylinders on both the front and rear cylinders were now a dark brown. Even worse than that was the condition of the front brake pads. Upon inspection, the pads were found to be worn right down to the steel backing! Once again the motorcycle Gods must have been smiling, (trust me it doesn't happen very often) because the disc was not damaged! Very lucky, because damaged discs would have added another $300-$400 onto the bill. Wash, wax, gas and ride ...
Well that seems to be about it. Let's see; the cables are lubricated, the carbs are cleaned and balanced, valve clearances are all happy, oil and filters are done, tires have air, brakes have new fluid and there are new pads on the front. The battery has been topped up and charged, clutch and throttle free play is now correct, there are two new spark plugs in the cylinder head, the drive chain is all slippery and properly adjusted, and the charging rate has been checked and passed. All that's left to do is a wash, wax, gas and ride. Oh yes ... and pay the bill. Here's a rough break down of the costs:
Hopefully that has put the fear of spending lots of unnecessary cash into you. Winterisation is a lot cheaper, trust me. Thanks for reading, Sonic. |
|||||||||||||||||||||||||||||||||||||||
|
© 2000 OMG Publishing
|