|
|
|||||||||

THE STORY SO FAR
 |
| Mr. Seck 'babys' the V-Strom. |
In part 1 of our long-term V-Strom update, we went over the fitting of a whole host of SW Motech parts (kindly supplied by Twisted Throttle), before Mr. Seck took it out on its inaugural dirt ride at one of Rally Connex's dual-sport events. Everything seemed to hold up well, but then he was babying it … somewhat.
The harsher testing was left to yours truly and on my return from a trip across the pond I promptly repossessed the beast, slapped on a pair of Metzeler Karoos (aggressive dual-sport rubber) and spanked it silly on a Motorally dual-sport day. The conclusion? Not bad … except for some minor denting in the cast ally rims. Hmhh, I did ride it pretty hard – maybe that was as bad as they'd get?
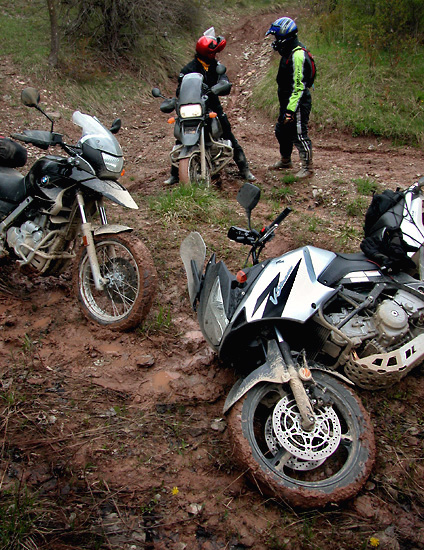
Apparently not, as on a subsequent Motorally ride I managed to clip a rather large rock – and at a rather high rate of knots – peeling back the wheel rim like the lid of a sardine can. Thankfully the tire held pressure, allowing me to crawl back to base and get the Strom home, but one inevitable conclusion remained – that was that for trying it out in the dirt. Well, at least till we could find some wire wheels for it, which to date seem to be rather elusive.
 |
|
Although it looks cool, the cast wheels are not suitable for serious dirt riding. Photo: Rob Harris |
Fitting spoked wheels would also break our original plans of just bolting on any available accessories, rather than replacing large chunks of the bike. Having said that, if all goes to plan and Suzuki are willing to let us buy the bike, we'll be getting a bit more creative with it in 2006.
Oh what to do, what to do? The original (and pretty well only) plan for the long-term V-Strom 650 for this year was to try and make it as dirt-friendly as possible and just see how gnarly a track we could make it go down.
Okay ‘arris, don't panic, there's a golden solution out there somewhere. It's time to go back to basics and consult with Mr. Seck and my long-time friends Mr. Glenfarclas, and his less-refined buddy, Johnny Walker. After an alcohol soaked brainstorming session, Mr. Seck came up with the obvious solution – road race it!
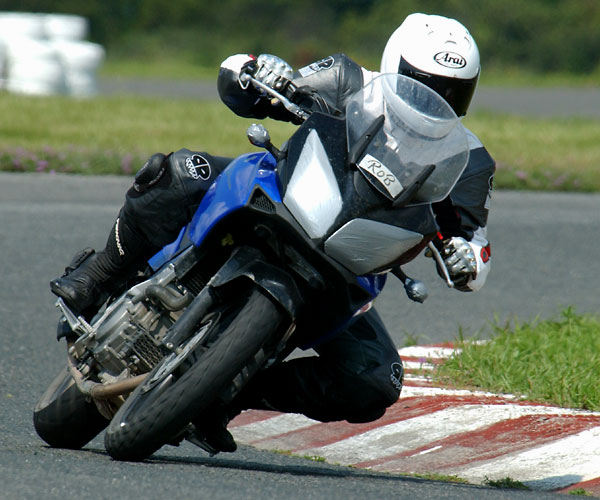
My initial reaction was to give him a good beating with the sensible stick, but then it dawned on me – why not? It's a dual-sport bike – one sport being off-road, the other being on. We'd even taken the Strom out on a track day once before and were frankly amazed at its ability to handle itself under such conditions.
 |
|
Mr. Seck proves the viability of putting a Strom on the track last year. Well, the possibility at least. Photo: Flair Photography |
Yeah, that's it, let's shift focus, shed weight, get sticky tires and maximize horsepower from that motor!
Well done Mr. Seck, sometimes stupid's good.
MISSION IMPOSSIBLE
Once we'd got through the morning hangover, the reality of such an obviously foolish idea hit us and the inevitable questions began: Just which class could we actually race it in? Where are we going to find any racing bits? When did I get that piercing? And will it really add to pleasurable sensations or just get caught up in Fluffy's wool? But I digress.
A quick call to CMG racing-guru, Mr. Tate, came up with the little known ‘Sportsmen's Class' – basically a catch-all class used by the SV Cup riders for extra practice and anyone else, who, like us, just weren't meant to take their bike onto a race track, but were stupid enough to give it a try.
Yes, sportsmen, that's us.
 |
| Cycle Max's Jen puts on the BT020 onto the front wheel. |
A check of the Shannonville schedule revealed a local round (avec sportsmen classes) at the end of September. Excellent. That would give us just enough time to release Mr. Seck on the mother of all scrounging binges and to subject myself to a stringent regime of body building, crotch-spreading and the adoption of a less caring, win-at-all-costs attitude (the latter of which I was already doing well at).
After some extensive research we soon realized that racing parts are not particularly abundant for the V-Strom. Actually, they were non-existent, leaving us to check out the sportiest road-going options that were as close to the racing end of the spectrum as possible.
And this is what we found:
TIRES – The Strom has a 19-inch front wheel. All modern racing wheels are 17-inch. This severely limited our choice in sticky rubber. We ended up finding three potentially suitable sets of sport touring tires, although two of them were bias-ply, and since Suzuki stipulate that you have to use radials, that left us with one choice – Bridgestone BT020s (sport-touring tires). Hmhh, limited choice kinda simplifies things sometimes.
 |
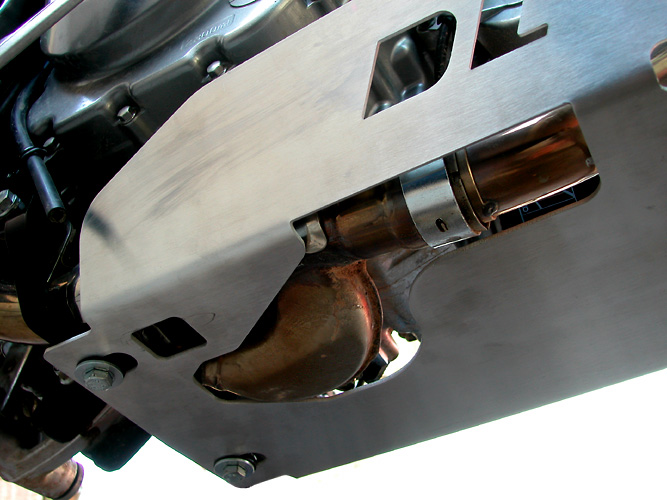
| The complete Leo Vince Evolution II system. |
Interesting to note, at least two tire producing companies that we contacted said that they will be making a set of sporty radials that will fit the Strom … next year.
PERFORMANCE – Predictably there's not much out there in the way of tune-up parts. But that's fine with us, as all we really wanted to do at this stage was to see what the easy bolt-on bits could do.
First port of call was to get an exhaust system for it. Original equipment exhausts tend to be heavy, under-tuned and a tad quiet, so a good replacement system seemed to be an obvious step. Interestingly, although there are a whole bevy of slip-on cans available (which would require cutting the original off, which in turn might not be appreciated by Suzuki) only one company made a complete replacement system – Leo Vince.
Mr. Seck did his magic with the freebie scrounging and one full-system Leo Vince was dispatched from Canadian importers Importations Thibault, directly to CMG headquarters in Toronto.
 |
| Setting up the Power Commander. |
However, according to our tuning guru, Jeff Bloor at Cycle Max, getting a pipe is only half of the equation, the other half being a Power Commander, which enables the fuel/air mixture to be fiddled with in order to smooth out any dips in the power/torque curves.
Mr. Seck? Done.
But before we got stuck into the tuning work, there was some race-prepping stuff to do …
RACE PREPPED (courtesy of Cycle Max)
Now tuning a bike for a race is only one of the things that need to be done in advance. There's also a whole load of prep work to the bike itself in order to meet the regulations of the race organizers and to try and make it as track-friendly as possible. This involved doing the following:
 |
| One of the first steps to race-prepping is getting Jeff to clean yer bike .... |
1) Drain the engine's coolant and replace with a track-friendly alternative – this is to ensure that in the event of a crash you don't spill slippery coolant on the track, thus endangering others who may have to ride through your spectacular high-side carnage.
2) The Jenny Craig diet – the 650 Strom comes in at a hefty 189 Kg (dry), with a chunk of this weight being for bits that are somewhat useless on the track.
Although I had originally intended on dumping the whole front fairing (including lights), we decided to keep it on for the extra wind protection and to keep the original look of the bike. Lights and indicators being disconnected and duct-taped over, naturally.
That left us with the rear rack (cast aluminium and very lardy), rear pegs (no passengers allowed), mirrors (don't look back, look forward) and the side stand (you'll need the extra clearance, besides we added a set of swingarm spools so that we could use a race-stand and thereby really look the part. Kind of).
 |
| As cool as it is, there's no place for the SW Motech bashplate on the race track. |
We also removed the SW Motech centre stand and sump bash-guard (although that would have given it a rather mean look).
3) For good measure we changed the engine oil (for some fancy Motul 5100) as well as the oil and air filter (which was by now a bit clogged with trail dust).
4) Drill/clamp and safety wire – this is for anything that may come loose and cause problems. For example; the oil filler cap, oil filter and oil drain plug. You're also supposed to do the brake caliper bolts, oil-cooler fittings and rad hose clamps, but we managed to get away with siliconing them thanks to our guest status at the race and desire not to drill too many holes in a bike that wasn't actually ours.
5) Finally, since the standard brakes had started to feel a bit wooden, we splashed out on a set of semi-sintered pads. Oh, and of course, affixed racing numbers to the rear.
 |
| Jeff (in full riding gear) does the inaugural dyno run. |
I think that's that for that?
Yes.
(CYCLE) MAXXED OUT
With that done and all the performance bits that we could easily get now in hand, it was time to take it for the tune-up.
The first step was to conduct a dyno run with the bike in stock trim so that we could compare any modifications done to that. This showed a pretty healthy and linear torque and power output, peaking at 43.3 ft-lbs (@ 6,500 rpm) and 64.8 hp (@ 8,500 rpm) respectively.
After this, it was time to fit the Leo Vince system and do it all again. Thanks to the lack of space and plenty of bits in the way, the pipe proved to be a bit of a bitch to install, not helped by the fact that it was missing a plug to fill the hole for the oxygen sensor (Canadian models don't have that sensor).
 |
| Scott Bain making a plug for the oxygen sensor 'ole. |
This was done quickly and efficiently by Scott Bain of Bain Machine Limited, who was handily located right next door to Cycle Max – thanks Scott.
Unfortunately, an intermittent dyno pick-up meant that the resultant graph wasn't really usable, although we did discern two things:
1) Max power was up by 2.5 hp, with a slight gain in torque of half a ft-lb.
2) Between 4 and 5.5k rpm, the torque curve took a rather sharp and sudden dip, losing about 4 ft-lbs at its trough.
Mixed results, but we had yet to try it with the Power Commander …
 |
| Editor 'arris 'helps' with the Power Commander fitting (flashing of arse crack gratis). |
For all of you who are uninitiated in the workings of a Power Commander, it is essentially a control box that plugs into the wiring of the bike's fuel injectors and into a PC via a USB port in the back. From here the amount of fuel delivered in the Low, Mid and High rev ranges can be adjusted by either adding or reducing the amount of fuel injected from the original factory mapping.
In theory, there are also a whole load of different maps that can be downloaded from the Power Commander website, although we didn't find any when we looked. But that doesn't matter, ‘cause we had Jeff and his dyno, who could adjust mapping as required.
Fitting the Power Commander requires the seat, tank and airbox be removed and took about an hour and a half in all (or slightly longer if you accidentally rip off the clutch cut-out cables and have to dismantle everything first before you find it!). Jeff noted that the Strom was about the most difficult installation that he had done to date, thanks to the number of parts that had to be removed to access the fuel-injector plugs. Although I suspect that having the ‘helpful' hands of ‘arris in the mix may have added to that.
 |
| The Strom airbox comes with restrictive intake rubber. |
While we were in there, we noticed a rather restrictive looking rubber air-scoop that feeds air into the airbox. Removing this meant the airbox intake hole was now significantly bigger and with a direct feed from the front of the bike. So why not remove it? So we did.
In order to get some idea how the removal of this restrictor affected the power curves, we slapped the Strom back on the dyno before doing the final Power Commander hook up. The initial dip was cut in half (now 2 ft-lb down on the standard set-up) although interestingly at the higher rpms, it was now down slightly.
Hmhh, if only we'd done this before fitting the Leo Vince we could have shown conclusively what this simple mod could achieve. Maybe this is something we could analyze in more detail next year?
 |
 |
| Here's the stock (blue) and final (purple) output curves – better across the range except for the initial dip at 4,500 rpm that we couldn't eliminate. | And here's the difference that the Power Commander made by smoothing out the blips (green). |
But there's no time for ifs, ands and buts, let's see what we can get the Power Commander to do …
After several runs, Jeff had managed to boost the power curves and smooth out the many dips but could not take out that initial dip – much to my disappointment and continual encouragement to please try it one more time. The final maximum output figures were 67.9 hp (up 3 hp from stock) and 44.9 ft-lb of torque (up 1.6).
But the question remains – how come the Power Commander couldn't eradicate that dip altogether? Jeff concluded that it's a result of pipe design, likely due to poor scavenging of the rear cylinder. This is a shame because the rear pipe's many cuts and welds are a work of art, albeit rather tortuous (although more on the perils of this design in part 2).
Actually, the Leo Vince is a work of art and IMHO looks just lovely on the Strom (although Assistant Editor Lewis begs to differ ... quite strongly). And that sound. Yes, this is a v-twin and at last it sings!
I wonder what it's going to be like on track?
A GRAND DAY OUT?
 |
| In part 2 ... |
And so it was that on the evening of the 23rd of September, the Team CMG car/trailer combo, equipped with one not-so-race-ready V-Strom 650 left the confines of the CMG workshop in downtown Toronto, destination Shannonville and racing history!
And with that, this seems like a good place to call a halt to proceedings for now. In part 2 of this update (posted in two weeks time) we'll tell the tale of how the old adage of never race with something you haven't tested proves itself once again, and just how well (or not) a set of sport-touring tires cope with a very wet race track.
Sigh
Wanna read part 2? Click here.
HOW MUCH DID ALL THIS COST (in theory)?
1) PARTS
 |
Power Commander | US$332.00 (approx C$400.00) |
| Semi-sintered brake pads* | 2 x $40.33 (that'll be $80.66) | |
| Leo Vince complete system | $1,259.95 | |
| Bridgestone BT020s (MSRP) | $197.99 (fr) & $235.99 (rr) | |
| Racing numbers (6) | $15.00 | |
| Swing arm spools | $64.99 | |
| Maxima Kool-Aid | $21.00 | |
| Sub Total | $2,275.58 |
2) LABOUR
(@ $80.00/hour)
 |
Install tires and brake pads | 1.5 hours | $120.00 |
| Coolant swap | 0.5 hours | $40.00 | |
| Base Dyno Run | 0.5 hours | $40.00 | |
| Install pipe (a bit of a bitch apparently) | 2.5 hours | $200.00 | |
| Safety wire and track prep | 3.5 hours | $280.00 | |
| Install Power Commander and dyno runs | 2.5 hours | $200.00 | |
| Further testing/dyno runs with airbox changes | 3.0 hours | $240.00 | |
| Miscellaneous stuff | 2.5 hours | $200.00 | |
| Sub Total | 16.5 hours | $1,320.00 |
 |
| Jeff amuses himself with the Leo Vince removable baffle. |
This gives a total cost of our project to be $3,595.58. Okay, that's a rather costly weekend of racing, and we haven't even included the fees associated with actually being on the track, but obviously there are areas where savings can be made.
For starters, we used Jeff to do all the labour as we're lazy, but we could have easily saved five or so hours by doing some of the more mundane work ourselves in the CMG garage. Even so, that's still close to a thousand bucks in labour. However, another five hours would be saved if we already had the ideal mapping curves for the Power Commander and hadn't spent so much time messing about with the variables. Hopefully, Power Commander will start listing some DL650 mapping options on their website in the near future, thus saving you the trouble (and expense).
We also got the most expensive exhaust option. There are quite a few slip-on cans available for the Strom, and at a much cheaper price, although we haven't tried any yet as we don't want to cut the stock pipe until we've managed to convince Suzuki to sell the thing to us. If all goes well we'll go back to the dyno with a few of the options next year.
THANKS TO
Bridgestone
Tires
Cycle Max
Power Commander
Leo
Vince exhausts
Bain Machine Limited (2565 Steeles Ave East, Unit 26, Brampton, Ontario.
905-458-0878)
![]()